hello everyone <3
So i've been on a bit of a hiatus lately and I just thought I'd chat with you all.. who ever is reading
So lemme just talk about the origins of this blog and how it all started.
I took a creative comp class last semester in high school and our final project was to do something that represented us as creative writers and well, ( SHOUT OUT TO MRS.FUDALA, her blog)
I thought I could represent myself through this blog. All was good and I loved creating blogs, but something horrible happened....
my macbook pro.. my baby boo.. had crashed due to a faulty battery so I took it into the apple store to get it fixed crossing my fingers that the genius bar could help. That was about a week ago and I just got an e mail that it is ready to be picked up! They haven't told me the price of the repair.. but hey.. its all worth it.
Now I know what you're all thinking, how the heck am I posting now?
Well i've been using my mom's dell laptop computer and lemme just tell you.. I aint a PC person. LOL. Plus this computer is super duper old and slow. Once I pick up my mac there will be more posts :)
OH BTW, I started a new blog over on wordpress and I may or may not move this blog over to that site as well. <3
Lifestyle blog
xoxo
Wednesday, January 22, 2014
Monday, January 6, 2014
Kelp noodles, say wha? Healthy korean japchae
Noodles are delicious, but it goes straight to the thighs (at least for me)... Standard noodles or pasta are loaded with carbs and gluten, high in calories, and leave you feeling bloated...But what if I told you that there are noodles that are 20 calories per serving, has over 70 different minerals and vitamins, high in iodine, which is essential for proper thyroid function, and is loaded with fiber? Yes, my friends, ladies and gentlemen, there is such a thing.

5. Prep your veggies. Dice the onion, mince the garlic, cut the green onion, destem the kale and cut it into tiny pieces.
 6. Heat your stove to high and in your wok or if you don't have one, your fry pan, and add some veggie oil and cook your garlic, but make sure it doesn't burn. Add your onions with a pinch of salt and cook will translucent. Then add your kale, and green onion.
 7. In a separate pan, sauté your shrimp with a little bit of veggie oil and add to your veggies when they're just cooked through. Avoid over cooking your shrimp because they'll turn into tough rubber erasers.
Kelp noodles, sea tangle, or 천사채 (chun-sah-chae) in Korean, is basically a raw vegan alternative to our traditional pasta. Now, don't get me wrong. These noodles are definitely not what you'd expect because they are made of brown kelp, but they are definitely worth trying. I first discovered this gem through Blogilates, an online pilates instructor/health guru who is all around AWESOME, and they intrigued me. (btw, check out her youtube channel here) She made these peanut miso kelp noodles that I have yet to try, so I thought it'd be cool if I made japchae with them.
Japchae is a kind of noodle stir fry that consists of glass noodles, made with potato starch, a variety of vegetables, and meat (typically beef). I love japchae so i felt like this was the next natural step in my culinary experiments and this healthy version of japchae is yummy!
Ingredients:
One package of Kelp noodles
5-6 prawns/shrimp (deveined and de-shelled)
2 tbsp of sesame oil
1 tbsp of oyster sauce
1/2 an onion
1 stalk of green onion
2 leaves of kale
olive oil
1 clove of garlic
1 tsp of garlic powder
1 tsp of Mrs. Dash
Salt and pepper to taste if needed
Sesame seeds
1. First, take your kelp noodles out of the package and give them a good rinse. You might freak out because of their weird texture, but just keep at it. Place them in your colander and get rid of all the water.
2. Place them in a separate bowl and cut them into your desired length. (I personally cut them into smaller pieces so they'd be easier to eat)
3. Boil some water and submerge the noodles in them and soak the noodles for at least 10-15 minutes. This'll make them a little softer and easier to eat.
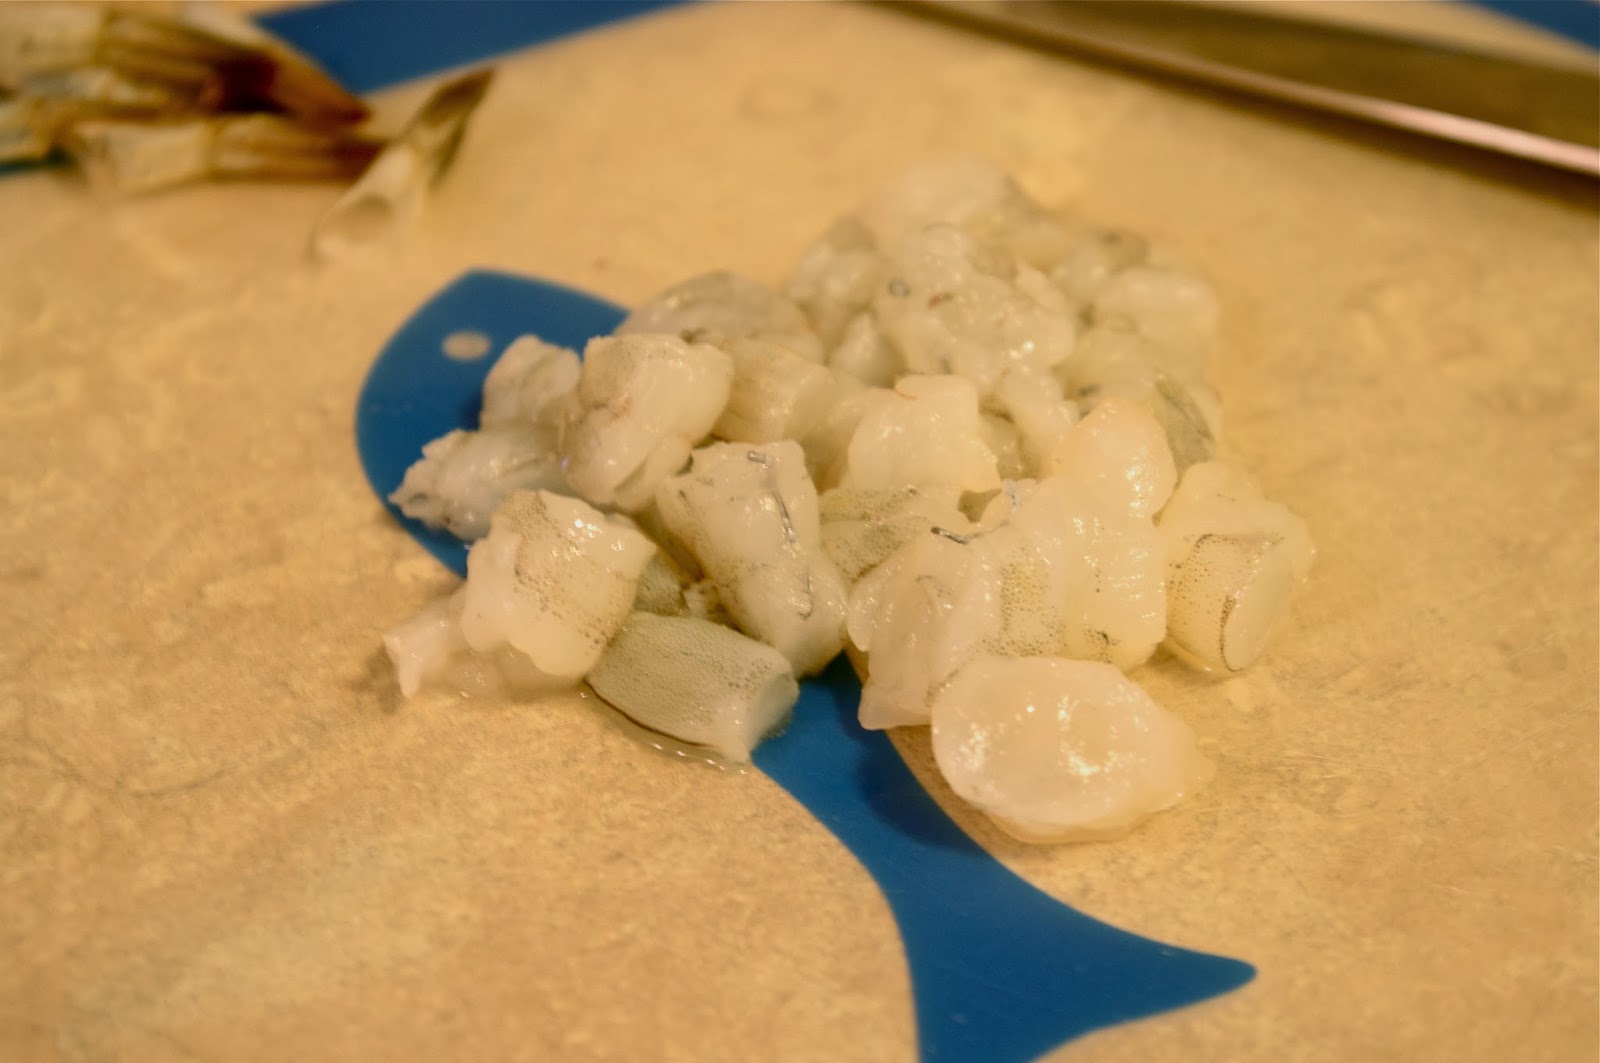
4. Prep your shrimp by de-stemming and deveining them. Cut them into bite size pieces and wash them with a little bit of salt and water to get rid of any extra dirt and pungency. Marinate your shrimp with the garlic powder, Mrs. Dash, and a dash of olive oil and keep it in the fridge for about thirty minutes.
5. Prep your veggies. Dice the onion, mince the garlic, cut the green onion, destem the kale and cut it into tiny pieces.
8. Add the oyster sauce and sesame oil to the wok and add the noodles in the bunch and stir fry together until the sauce coats the noodles.
9. Serve with a sprinkle of sesame seeds and enjoy!here

Thought blurbs
I actually enjoy this version a lot more than traditional japchae because it doesn't leave me feeling gross afterwards. I also eat this with some sriracha (Thai hot sauce) and some kimchi. Haha, but these noodles are very versatile and they definitely are filling. Please try this out!
Happy cooking <3
Monday, December 16, 2013
Macarons
Ah, the pastry that most cannot spell nor pronounce. Most neglect the fact that there is only one "o" in its name and pronouncing it with two usually implies the coconut macaroon which is also delicious but completely different in its entirety. It was quite a journey learning how to make these little rascals. They have extremely high standards in order to achieve the desired shape, consistency, and color but you just need to be patient with them.
 |
| My second attempt at making macarons |
Ingredients
For the shell:
2 egg whites
4 tbsp of granulated sugar
1/2 c almond meal/flour
1 c confectioners sugar
1 tsp of vanilla extract
For the filling:
2 egg yolks
1/4 c granulated sugar
6 tbsp of butter
1 tsp of vanilla
4 tbsp of milk
Tools:
Electric hand mixer/ Kitchen aid
Two bowls
measuring cups
pastry bag with large round tip
parchment paper
baking trays
Instructions:
1. In a bowl, add your egg whites and whip them with your electric hand mixer until frothy. After it reaches its soft peak stage, add your sugar tbsp by tbsp until it reaches it's stiff peak stage. Also remember to add your vanilla after adding your second tbsp of sugar. It should look glossy and viscous at the end.
2. In a separate bowl, sift your almond flour and confectioners sugar together. Set that aside.
3. Add your dry ingredients to the egg white mixture in 3 increments and fold it together. This is called "macronnage" in which you take your spatula and try to get out a sufficient amount of air in order to create the correct consistency. This part is one of the most important parts. You want the mixture to flow down but it cannot be runny! Over mixing the batter results in pancakes and under-mixing your batter creates little domes of almond pastry.
4. Put your mixture into a piping bag and pipe the mixture onto a lined baking tray. Make them as uniform as possible, by keeping its diameter to 1 1/2" circles.
5. Leave the pastries out to dry for 30 mins to an hour. This is very crucial!!!!! The macarons have to form a shell in order for them to have a dense texture and to create those cute little feet.
6. After the shell has formed, drop the pan two inches above a hard surface to get rid of any extra air pockets in the batter.
7. Bake for 10-15 minutes at 300 degrees F.
8. After they have come out of the oven, have them rest for a good 15 minutes to let them cool down. They should slide off of the parchment paper with the bottoms intact.
For the cream:
In a saucepan, whisk your eggs and sugar together. Add your vanilla and milk. Heat over medium heat while continuously whisking. When thickened, take off the heat and add your butter. Keep it in the fridge until needed.
Once both the cream and shells have cooled, take your butter cream and fill another pastry bag with a large tip, and then pipe it onto one side of the shell and gently sandwich another shell onto the cream. Continue until all shells have been filled.
The macarons taste better and hour after they've been made. It also helps if they're slightly chilled in the fridge. :)
The macarons taste better and hour after they've been made. It also helps if they're slightly chilled in the fridge. :)
There you have it ! I hope you try this out :)
Happy cooking !
Poached eggs
I like my eggs poached as opposed to scrambled or over easy. Call me classy but seriously.. it's delicious. The yolk just has this rich texture one
it hits that hot water. Poaching an egg may be easy peasy for some, but a
disaster for others, but I have a trick that will help you get the perfect
poached egg each time.
Ingredients:

Water
1 tbsp White distilled vinegar
Salt/flavoring of choice
Tools
Shallow pan
Slotted spoon
Stove
Small bowl
Large bowl with cold water
Instructions
Fill your pan with water and set it on high to bring it to a
rolling boil. When it reaches boiling point, lower your heat to about medium
low to let it simmer. Add 1 tbsp of
vinegar into the water. Meanwhile, crack your egg into the bowl without
puncturing the yolk. Add your flavoring of choice to the egg in the bowl and
slowly slide it into the water in one piece. Using your slotted spoon, gather
the egg into one piece. Leave the egg to bathe and cook for about 5-7 minutes
before removal. Place your finished egg into the cold water and there you have
it. J
Thought Blurbs

I love to use poached eggs on a bed of sautéed spinach and
greens, on an eggs benedict, on my bibimbab (Korean mixed rice bowl), or loads
of other dishes. The runny yet firm yolk is what truly catches my eye.
I hope this solves any of your poached egg mishaps.
Happy cooking <3
Monday, December 2, 2013
Let's Talk About Fruit Tarts
I have to be honest... I have a love/hate relationship with fruit tarts....
I've never been able to perfect a recipe for this sweet, nor find one, and I was just about to give up until I came across the site joyofbaking.com. Oh my goodness gracious. This fruit tart will have heads turn and mouths water for sure. Again, the following is not my own recipe!
This is the direct link to her website. :)
http://www.joyofbaking.com/FruitTart.html
Ingredients
Sweet Pastry Crust:
Pastry Cream:
I've never been able to perfect a recipe for this sweet, nor find one, and I was just about to give up until I came across the site joyofbaking.com. Oh my goodness gracious. This fruit tart will have heads turn and mouths water for sure. Again, the following is not my own recipe!
This is the direct link to her website. :)
http://www.joyofbaking.com/FruitTart.html
Ingredients
Sweet Pastry Crust:
1 1/2 cups (195 grams) all purpose flour
1/8 teaspoon salt
1/2 cup (113 grams) unsalted butter, at room temperature
1/4 cup (50 grams) granulated sugar
1 large egg, lightly beaten
1 1/4 cups (300 ml) milk (whole or 2%)
1/2 vanillabean, split lengthwise or 1 teaspoon pure vanilla extract or vanilla bean paste
3 large eggyolks
1/4 cup (50 grams) granulated sugar
2 tablespoons (20 grams) all-purpose flour
2 tablespoons (20 grams) cornstarch(corn flour)
1/2 tablespoon liqueur(Grand Marnier, Brandy, Kirsch) (optional)
Apricot Glaze: (optional)
1/2 cup (120 grams) apricot jam or preserves
1 tablespoon water
Topping:
3 cups (720 ml) fruit (raspberries, blackberries,strawberries, blueberries, kiwifruit, bananas, plums, pineapple, melon, etc.)
(I personally used blackberries, raspberries, kiwis, strawberries, and blueberries. yum)

I followed her instructions word for word and they are on her website.
Thought Blurbs
I've had a lot of failed attempts at fruit tarts... I don't know how but I'd always end up over baking the crust and the pastry cream would be too dense... fail.
 This recipe has a good balance of both a sweet crumbly crust to light but rich cream. It is definitely a crowd pleaser and the fruits look like gems once you coat them with that sweet apricot glaze. Overall, this recipe was extremely easy to follow and delicious. This recipe would be one that would be great to make during the summer or spring when the fruits are nice and ripe.
Now, I do not own a tart pan in which is unfortunate... so I used a cake pan with low sides which worked out fine, but this definitely would look a lot better if you used a pan with fluted edges. It just adds to the beauty of the fruit and the elegance of the sweet overall.
Definitely go and try this out! Happy cooking. <3
(I personally used blackberries, raspberries, kiwis, strawberries, and blueberries. yum)
I followed her instructions word for word and they are on her website.
Thought Blurbs
I've had a lot of failed attempts at fruit tarts... I don't know how but I'd always end up over baking the crust and the pastry cream would be too dense... fail.
This recipe has a good balance of both a sweet crumbly crust to light but rich cream. It is definitely a crowd pleaser and the fruits look like gems once you coat them with that sweet apricot glaze. Overall, this recipe was extremely easy to follow and delicious. This recipe would be one that would be great to make during the summer or spring when the fruits are nice and ripe.Now, I do not own a tart pan in which is unfortunate... so I used a cake pan with low sides which worked out fine, but this definitely would look a lot better if you used a pan with fluted edges. It just adds to the beauty of the fruit and the elegance of the sweet overall.
Definitely go and try this out! Happy cooking. <3
Friday, November 29, 2013
Eggless Tiramisu Cups

Eggless Tiramisu
Thanksgiving is all about the turkey, but let's get real here... you can't forget about the desserts. Pumpkin pie is great but tiramisu is just so sexy and decadent, I can't help but make it every single year. This'll definitely have you popping that pants button open to stuff in every bite. It's easy to serve as well. No alcohol or eggs were harmed in the making of this recipe. :)
Ingredients:
Cheese layer
-1 8 oz package of Marscapone cheese
-1/2 c of heavy whipping cream
-1 tsp of vanilla
Biscuit Layer
- 1 package of lady fingers
- 1 c of water
- 3 tbsp of instant espresso
- cocoa powder
Cream topping
- 1/2 c heavy whipping cream
- 4 tbsp of granulated sugar
- 1 tsp of vanilla
Tools
- mixing bowls
- electric mixer
- spatula
- clear plastic cups
- frosting spatula
- strainer
- paper, scissors
Instructions
 Let the Marscapone cheese get to room temperature. In a mixing bowl add 3 tbsp of sugar and the vanilla. Beat it with the spatula until incorporated and thickened. In a separate mixing bowl, beat your cream with the electric mixer and when soft peaks form, add the rest of the sugar. Don't over mix the cream or it'll separate! Mix until soft but not liquidy. Then add your cheese mixture to the cream and fold until incorporated. Be gentle. :) Set that aside. In another bowl, take 1/2 c of cream and beat it till it has soft peaks and then add the sugar. Beat until almost firm peaks form.
Cut your biscuits into thirds and set aside.
I use margherite cookies because they have an extremely light and crumbly texture that I think matches the Marscapone cheese more than ladyfingers do.

Add your espresso to the hot water and let it cool. Take your biscuits and cut them into thirds with a bread knife.


Repeat these steps 2 more times, and when the biscuits are exposed, take your frosting spatula and the whip cream mixture and add it to the top. Create a smooth surface since this'll be your blank canvas for the cocoa topping.
Cocoa topping
You can do this one of two ways. You can just sprinkle the tops with cocoa and call it a day, or make a cute design on top. I always make hearts, but you can mix it up. Cut out your shape in the paper, and place it on top of your tiramisu and sift the cocoa on top. Carefully remove them with tweezers or your hands if you're more courageous. :) Let these bad boys set up in the fridge for a good 6 hours before serving!
 I really hope you guys try this out!
Happy cooking <3

Friday, November 22, 2013
Individual green smoothie recipe

Green Obsession
Green smoothies have been extremely popular, and I have to admit that I'm obsessed with them! They may look unappealing but you really can't beat it till you try it. They're satisfying, refreshing, and a great snack in between meals. I can't express how many benefits this drink has. I know that there are a lot of green juices out there that you can buy, but they're extremely over priced and to be honest, they aren't as healthy as they seem. Most of the bottled juices don't use raw ingredients, and things that can stay in a fridge for more then three days aren't going to be as beneficial for you as opposed to making it fresh :). Here's my little twist on the traditional "green machine" or "green smoothie". I call mine the Green Obsession. Here's what you'll need!
Ingredients
1 very ripe banana (Make sure it's ripe because it'll make the smoothie extra sweet)
1/4 c of frozen pineapple
1/2 c of baby kale or two leafs of kale
1/3 c of water or coconut water
Equipment
Cutting board
Blender ( I use an individual blender, but a normal blender will do just fine. )
Instructions:
First you'll need to cut your banana or do the traditional "rip and tear" and add that to your blender. Then add 1/4 c of frozen pineapple, 1/3 c of water or coconut water, and then your kale on top. Blend until smooth! (I use frozen pineapple as a replacement for ice, but you can use fresh pineapple and add ice if you wish to do so. I just think adding frozen pineapple instead of ice creates more a pleasurable texture. )
Thought blurbs
I drink this smoothie every single morning. It's my replacement for coffee or tea. Because of the many nutrients in kale and the fruits, it boosts my energy levels to the extent that caffeine would. I've been making this smoothie every morning for about 6 months now, and it's definitely benefitted my body. I have eczema, a skin allergy in which gets dry and extremely itchy, and ever since I've been drinking this, my eczema disappeared. There are a lot of variations of this recipe and whilst experimenting with different fruit combinations with kale, I've found this to be my favorite.
Why Kale?
Now, kale has recently become a hot topic amongst health junkies and food articles. The reason being is because it has AMAAAAZING benefits that most neglect. Kale is jam packed with many antioxidants and it is high in vitamin A which is essential for fighting off free radicals and keeping your skin looking radiant. Kale also is extremely high in vitamin K. Vitamin K is a very important vitamin to incorporate into your diet because it helps protect against various cancers. It also helps with the "ahem" bowel movements and aids in weight loss. Kale is also high in calcium. In fact, per calorie, kale has more calcium then milk!
I hope you try this smoothie out and radiate from its benefits.
Happy cooking
Subscribe to:
Posts (Atom)